
Let 's face it. As email marketers, one of the things we want to know the most is how our customers feel and think about our brand. The more insight we get, the more we can customize what we’re selling.
What is the Mailchimp survey tool?
The Mailchimp survey tool can help you collect responses from your audience in many useful ways. Just like the way segments and groups in Mailchimp help you organize your contacts, surveys and polls give great feedback about your customers' likes and opinions.
Even if you think you know the main core of your audience, their needs and awareness of your brand can shift at any given moment. On top of that, surveys tend to have a higher open and click rates.
Keep reading below to get all the scoop on how to create surveys and polls with Mailchimp and how to integrate them into emails.
How to create a Mailchimp survey
There are several ways to create surveys in Mailchimp.
Adding a simple survey or poll to your email content
Before you get started with the Mailchimp survey tool, you might want to read about Mailchimp merge tags if you’re unfamiliar with the concept.
- In the left sidebar, head to “All Campaigns” and select the one you’re working with. In the Content section of the builder, click Edit Design.
- Add a text content block to the layout. Type the question you wish to add in the text block. Then, after the question, type or paste the *|SURVEY:|* merge tag and type the available answers after the colon.
Make sure to use a different *|SURVEY:|* merge tag for each response. Here’s an example:
QUESTION: On a scale from 1 to 10, how likely would you recommend our brand to a friend?
*|SURVEY: 1–3|*
*|SURVEY: 4–6|*
*|SURVEY: 7-9|*
*|SURVEY: 10|*
This is what your subscribers will see:

After a subscriber clicks any of the responses (only one response is allowed), they’ll be redirected to a survey landing page.
Creating a survey landing page in Mailchimp
- Go to the Audience dashboard
- Click the Manage Audience drop-down and select Signup forms.
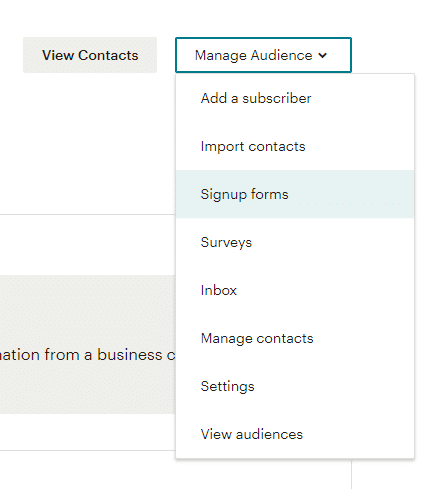
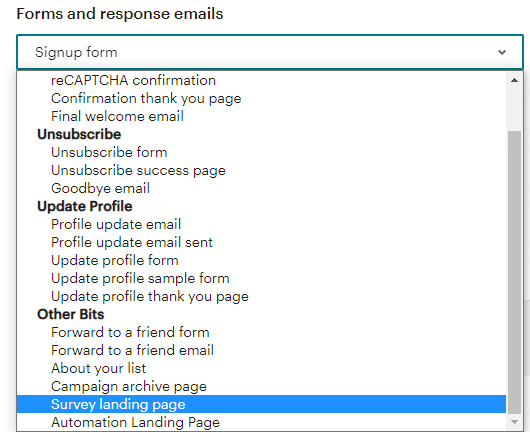
3. Select “Form builder”.

4. On the drop-down menu, select "Survey landing page".
5. Use the tabs “Build it”, “Design it” or “Translate it”, to customize your survey landing page.
To consult the results of your survey, click the “Campaigns” icon, then “Reports”. Select “View Report” and click the Analytics360 tab. You’ll get a complete breakdown of your survey.
PRO TIP: A simple survey is recommended when you want to ask one single question to your audience. This is because the response will be shown on the report, but not the question, so if you add several questions to the survey, it might be confusing when you review the results.
If you want to ask more than one question, we recommend using a hosted survey.
Using a hosted survey
Hosted surveys are linked to a specific audience in your Mailchimp account. Keep that in mind when creating a hosted survey, as the audience can’t be changed afterwards.
To create a hosted survey, follow these steps:
- Search the left side bar for the Create icon.
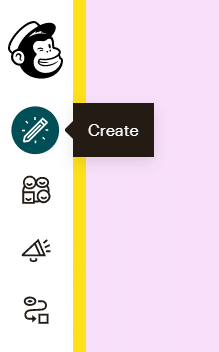
2. Click Survey, then select the audience you want to work with. Click Begin.
You will be taken to the survey builder, where you can start designing your survey. Click Add a question to begin. You’ll be asked to choose an answer type between several options.
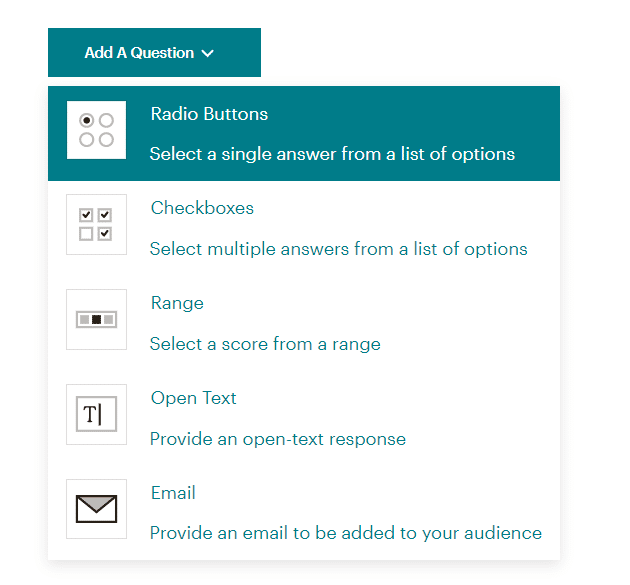
Here’s a breakdown of each of the options available:
- Radio buttons. You can create a multiple choice question with the Radio buttons option, where only one answer is possible.
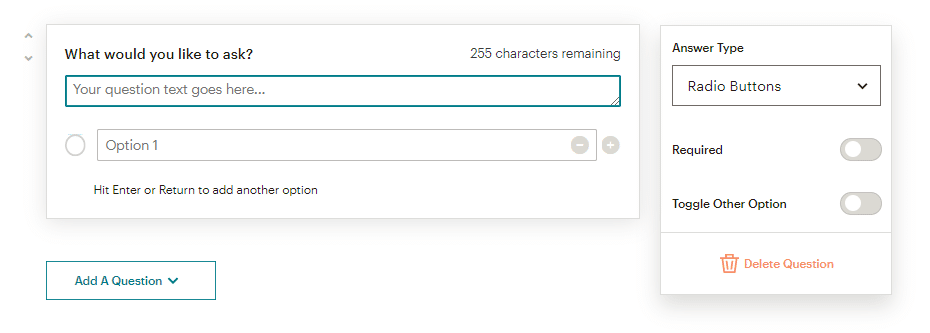
- Check boxes. Under this option, you’re allowed to create one multiple choice question with many possible answers.
- 0-10 Range. Compose a question that allows you to grade in a 0-10 range.
- Open text box. Allows users to provide a text answer.
- Email. You can ask respondents to submit their email address and subscribe to your email marketing.
After you’re done with the question settings, you can customize and design the survey.
Customizing a hosted survey
Use the options below to custoomize your hosted survey.
- Branding. Add an image to personalize your survey.
- Custom messaging. Add a text description, a submit button, a confirmation message and a closed survey message.
- Finally, you have the styles tab, to edit button and background colors.
Toggle on the slider to activate the survey. Now, you have the option to share it in a social post like Facebook, or a Mailchimp email.
And voilà! You have successfully finished your first survey in Mailchimp.

How do I see survey results in Mailchimp?
You can view the results with a full overview on the survey summary page.
Keep in mind that you can unpublish any survey without deleting any of the responses you’ve collected. (If you choose to delete it you will lose all the answers).
To unpublish, simply go to the survey tab and toggle off the slider of the survey you wish to deactivate. Any user that clicks a deactivated survey will be shown a message that the survey is closed.
Tips for creating useful surveys in Mailchimp

As you can see, the advantages that Mailchimp offers with surveys and polls are significant. Take a look at some useful tips to better understand your customers with the use of surveys and polls.
- Get in the habit of automatically surveying new subscribers.
- Determine how well your products fit the market by asking your customers to review them.
- Discover how willing your customers are to pay for certain products.
- Test ideas for new products and services, asking your subscribers and potential customers how they feel about them.
- Collect feedback from customers who support your service but most most importantly, take the time to ask those individuals who didn’t have a positive experience. This feedback can be golden and can help you find opportunities for improvement.
Looking for Mailchimp experts?
We're Duckduckchimp, the Mailchimp Agency that can get you tailor-made customizations and help you get the full potential for your email campaigns.
No Comments.