
If you’ve been using Mailchimp as your newsletter and email marketing platform, surely by now you’ve realized that sometimes that great campaign you crafted so beautifully might end up in a spam folder.
Sounds a bit familiar perhaps? Fortunately, there are several practices you can do to prevent this from happening. Below these lines, we’ll analyze the key factors of why your Mailchimp emails are going to spam.
Why are Mailchimp emails going to spam?
In a sea of email marketing overload, spam filters successfully block irrelevant, fraudulent or unsolicited emails, including scams and viruses. However, sometimes a perfectly legitimate campaign can get entangled in the web of spam filters.
Even if you comply with the requirements of the CAN-SPAM Act and other related spam laws, there’s still the chance that your valuable email marketing content is ending up in a forgotten junk folder, destined to oblivion or worse, getting an abuse complaint.
How spam filters work
To understand why your Mailchimp emails might be going to spam, it’s important to know how spam filters work.
There is a long set of criteria that determine whether an email will pass filters or otherwise get flagged as spam. Each individual server administrator calculates their own “spam scores”, so what can be considered “Not junk” for Server X might be different for Server Y.
Bad news with spam filters is that there is no magic formula to completely avoid them. In spite of this, there are certain habits that will help you avoid the dreaded subscribers junk folder.
How to prevent Mailchimp emails from going to spam
Pay attention to the following criteria to prevent Mailchimp emails going to spam.
IP Address
Certain spam filters can flag emails if they detect that one particular IP address has sent spam.
Mailchimp email campaigns are sent through their servers, so if your IP address has been subject to spam in the past, this could seriously affect deliverability for your emails.
Metadata
One way to improve the deliverability of your emails is addressing them with the recipient’s name and not their email address.
You can do this by personalizing your campaigns using merge tags and asking your subscribers to add your email address to their safe sender list.
Just as it takes time to grow an email contact list, building a healthy domain reputation is a labour of love. Even verified, private domains can be severely filtered, so it’s always recommended that you verify your domain to improve your reputation and help protect your domain from being used without permission.
How do I verify my domain?
To verify your domain, head to the left sidebar and click the Website icon.
- Click Domains.
- Click Verify Email.
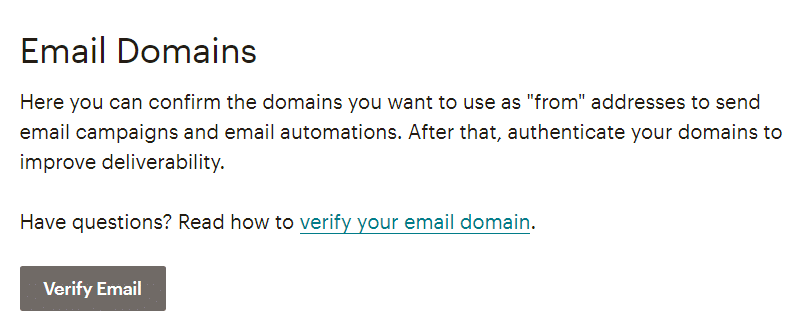
- Type the company’s email address you want to verify. Then click Send Verification Email.
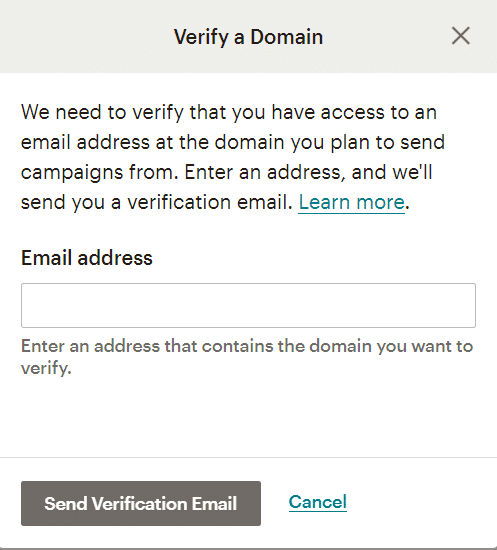
- You’ll be sent a verification email where you can either click the Verify Domain Access in the email or type a verification code in Mailchimp.
- Once it’s verified, you’ll get a pop-up success message.
Domain Authentication
To improve deliverability, you can choose to authenticate your domain, an optional process where you’ll need to copy and paste information from Mailchimp to your domain provider's site.
Doing so will show your campaigns to come from your own domain and not from the default Mailchimp domain.

- After verifying your email domain, click Authenticate.
- You’ll get a pop-up message with the information you need to add to your domain provider to edit your domain's DNS record.
DNS records are named differently depending on the domain provider. These records might be: Add a CNAME Record, edit or manage DNS Record, or DNS settings, to name a few.
Comply with opt-in methods
Apart to complying to spam laws, one essential step to avoid spam filters is securing permission from your contacts to send information. In other words, you must have permission from your subscribers that they have opted-in to your audience.
To protect users and their data, Mailchimp complies with CAN-SPAM Act, the U.S. law that regulates email marketing. When you send email through Mailchimp you must agree to these anti-spam conditions:
- Mailchimp terms of use.
- You must provide an unsubscribe link in every campaign you send.
- Your physical mailing address and contact information must be included in your emails.
- The information of your email subject lines must be accurate and not misleading.
- You must approve terms of use regarding any integration or e-commerce connection.
- All these terms must be complied, even if your company is registered outside the United States.
On the other hand, email marketing in the European Union has to comply with the GDPR (General Data Protection Regulation). This European law rules on privacy and regulations on how the private data of individuals is treated.
Manage your recipients
Managing your recipients is another helpful step to avoid spam filters. If a number of users click the Report Spam button, your emails might be going to spam even if you follow all the said recommendations.
In Mailchimp, there is no way of knowing if a campaign has been flagged as spam, however reports can shed lots of insight that can help you with your campaign’s performance.
Your own recipients, and how they interact with your emails, can be a trigger for spam filters. When a recipient thinks that your email is spam and marks it as such, Mailchimp generates an abuse complaint.
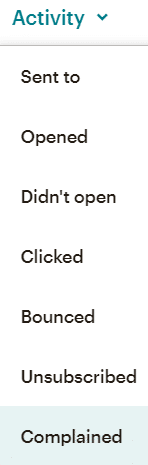
If that happens, Mailchimp will remove that email address from your list and place it into the abuse complaints area. You can view that in your campaign reports, clicking the Activity drop-down menu and then “ Complained”.
It’s considered normal to get 1 complaint per 1,000 recipients. Flagging an email as spam can also be done by accident by any of your recipients.
However, if you get too many abuse complaints, you’ll first get a warning and if it continues, your emails might end up being blocked and your account could face suspension.
Best practices to avoid spam filters

We can't stress enough the fact that you need permission from your contacts before you start sending them emails.
By default, Mailchimp signup forms use the double opt-in method, requiring the subscriber to click a verification link sent by email to confirm the subscription. This is unmistakable proof that the recipient gave permission to get your emails.
Never presume that you have permission to send emails to customers, even to those who have already purchased from you. A good advice is to add a signup form to your WordPress site or landing page and give your potential subscribers a proper way to opt-in.
Overusing the words “sales” or “discounts” in your subject lines is an open invitation to be marked as spam.
Finally, try not to make all of your marketing about hardcore selling. Alternate the content you send to your subscribers with added value like articles that might interest them for example.
No Comments.